Share:
A Watercolor Demonstration with Brenda Swenson
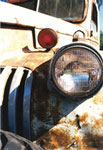
In this demonstration I am painting a close-up of a 1946 Chevrolet pick-up, hence the title “CAL 46”. I have been fascinated with old trucks for years, and a large body of my work is inspired by them. I came across this truck at a nursery, where it was being used to display an array of plants. I was captivated with the way the light streamed across the front of the fender and grill. I knew I had an interesting photograph, but the most successful paintings start with a good drawing. It is helpful to remember “a camera has one eye and no brain”. It is our job as artists to put life into our work, and not be bound by a photograph.
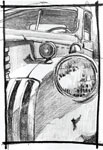
STEP 1 Before I begin to paint, I work out the design, value plan, and color scheme. A value study helps me to have a plan of attack. When working with watercolor in a transparent manner, it is essential to be aware of areas that are to remain white. I am not fond of masking fluids, so a plan is essential. I enjoy the process of planning and drawing. The time spent planning allows me the opportunity to walk through the painting process in my mind, before I begin to paint.
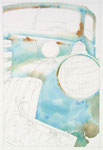
STEP 2 To give the appearance of old painted metal, I will build up the body color in stages. The first wash is a mixture of Cobalt Teal Blue, Azurite Genuine and Yellow Ochre. I put three large puddles of these colors into the center of my palette. I allow all 3 colors to mix slightly on the edges, but have pure clean colors in the center of each puddle. As I paint this large wash I am able to shift the colors slightly by pulling from the mixtures on my palette. In the areas that turn towards the sun, I will warm up the body color with Yellow Ochre. Before the wash has dried, I drop in a small amount of Quinacridone Sienna into the areas that I want to look like rust.
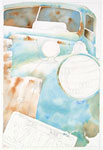
STEP 3 To paint the grill section I first wet the paper with clean water. I then paint in a light value of Burnt Sienna and Lunar Black, allowing the colors to mix on the paper. For the interior of the cab, I want my values to be darker. To achieve this, I use a richer mixture of Burnt Sienna and Phthalo Blue (rs).
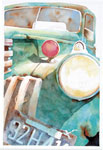
STEP 4 I call this stage the “Adolescence of a Painting”, for many reasons. The first reason is that it feels awkward, and doesn’t have maturity in its appearance or feel. I am inclined to want to walk away for awhile, and rethink my plan. But just like with an adolescent child, you need to stick around and work through the awkward and sometimes difficult phases. By sticking with it, we are often amazed with the beauty that unfolds. To build up the body color of the truck, I now add my first glaze. My focus is on the fender, and the side of the hood. This area is turned from the sun, so the colors are darker in value.
At this point, I add a glaze of Cobalt Teal Blue, Quinacridone Sienna, and just as the fender turns towards the sun, I add a small amount of warmth with Quinacridone Gold. The license plate is a mixture of Lunar Black and Cobalt Blue. More Quinacridone Sienna is added into this wash while it is still damp, around the headlight and crack in the fender. The moisture of the paper is critical for the paint to be able to granulate and create the texture I desire for the effect of rust.
 Colors used in Step 4: Quinacridone Gold, Cobalt Teal Blue, Lunar Black
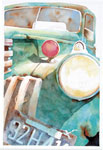
STEP 5 Lots of fun things happen in this STEP, which helps to give form and shape to the truck. Probably the most important is the addition of cast shadows. More information can be said through shadows than any one element. A common mistake is making all shadows one color. Cast shadows have the colors of the object for which it is cast on. Anywhere you see a shadow on the truck; it is a darker value of the color beneath it, except for the areas in full sun. The objects that cast a shadow are the head light, red light, and the overhang of the hood. Generally a cast shadow will be 40 percent darker in value. I am careful to make sure that I have a large enough puddle of color, to do the large shadow beneath the headlight. Nothing is worse than running out of paint half way through a wash. You will end up with a shadow that looks choppy, and not fluid. In this STEP, I also paint the red light with Carmine and Quinacridone Red. I also add a small amount of this mixture into the grill, to echo the color elsewhere, so it doesn’t become an isolated color. In addition, I put a light wash of Quinacridone Gold over the headlight, as an under painting for later. Now you can begin to see the benefits of the underpainting, as I paint the negative spaces between the grill. I use Burnt Sienna, Phthalo Blue (rs), and Carmine, allowing the colors to mix on the paper. By mixing paint on the paper instead of on the palette, watercolors have a chance to react to each other on the surface of the paper. Painting with this technique creates some very exciting effects that can only be created with this medium.
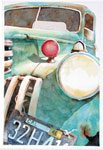
STEP 6 At this stage of the painting, I have a better feeling for how it is beginning to hold together as a whole. Up to this point, many of the sections were dealt with separately. Now however, I need to make a conscience decision about the painting as a whole. I need to work on sections where the values need to be adjusted, in order to create a stronger feeling of unity. I will now add another glaze to the license plate, using the original colors of Lunar Black, Cobalt Blue, and Quinacridone Sienna.
I carefully paint around the numbers, and intentionally allow puddles of paint to be thick, creating the feeling of texture. The addition of Yellow Ochre on the 46 tag, as small as it may be, is an important part of the design. I like to have colors echoed throughout a painting. Having this yellow here, allows me to have additional color to warm up a dull area. There is a small turn signal on top of the headlight. This little area gives a relief from a painting that has a lot of large sections. I also believe the headlight would have appeared “starklooking” without this smaller shape. I used Burnt Sienna and Lunar Black to paint the details.
 Colors use in Step 6: Carmine, Yellow Ochre, Lunar Black
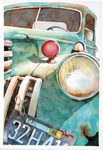
STEP 7 Here is where I can begin to paint some of the small pieces of the painting — the steering wheel, wires on the license plate (notice the red echoed here) and the headlight glass. I also adjust the red on the light. It appeared too bright, and a glaze of Carmine with Burnt Sienna on the left side resolved this. For the headlight, I use a light glaze of Quinacridone Gold, Cobalt Blue, and Quinacridone Red around the inside edge. I let each color mix on the paper. When this glaze is dry, I can begin work on the details.
 Colors used in Step 7: Cobalt Teal Blue, Quinacridone Gold, Burnt Sienna.
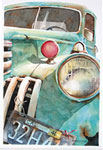
STEP 8 I was once told all paintings start off looking the same. And it was the final marks we made that distinguish who we are. In a way these final strokes are our “signature marks.” I believe this to be true. As I look over the painting, I notice that the small window inside the cab has become a focal point because of the dark value encapsulating a light value oval. This is not what I want, so I paint a wash over this area using pigment that has become dulled down in the center of my palette. Most people call this “mud.” These grayed or neutralized colors are wonderful for pushing back areas, or dulling a section of a painting that has become to dominate. I always save my favorite part for last, and in this painting it is the headlight. Over the years, I have come to think of trucks as more than metal and rust. When I add the final touches to the light, it is almost as if the little truck is looking back at me. I hope you have enjoyed my demonstration.
 Colors used in Step 8: Quinacridone Sienna, Lunar Black, Quinacridone Gold
A thought on “Artistic License”
You will notice from the reference photograph that a license plate is not in the picture. The main reason I added it was for design purposes. I needed something that would complete the movement of the eye through the painting, and away from the corner. Remember, what’s happening on your paper is more important than reality.


