Vẽ tranh thành công từ cuộc sống hoặc từ ảnh chụp phần lớn là quá trình quyết định những gì KHÔNG nên đưa vào. Bất kể chủ đề của bạn là gì, khi bạn bắt đầu vẽ, sẽ có nhiều thông tin hơn trước mắt bạn so với những gì bạn nên cố gắng đưa vào bức tranh. Mắt chúng ta có thể phát hiện ra một phạm vi vô cùng tinh tế của giá trị, màu sắc và kết cấu, nhưng nếu đưa vào ngay cả một nửa những gì chúng ta có thể thấy thì sẽ dẫn đến một bức tranh được tô vẽ quá mức, không để lại gì cho người xem làm.
Những bức tranh mà tôi ngưỡng mộ nhất sử dụng phương tiện tiết kiệm thực sự. Chúng cho tôi cảm nhận được sự hiện diện của chủ thể mà không quá cụ thể. Nếu một bức tranh cho tôi thấy nhiều hơn những gì tôi cần biết, tôi bắt đầu cảm thấy bị loại trừ, như thể tôi có thể không phải là một phần của đối tượng mà nghệ sĩ đó hướng đến. Trong tác phẩm hay nhất, có một mối quan hệ đối tác giữa nghệ sĩ, phương tiện và người xem dựa trên trải nghiệm chung của chúng ta với tư cách là những người nhạy cảm về mặt thị giác. Tôi cho rằng đối tượng giả định của tôi cũng cảm thấy như vậy, vì vậy tôi cố gắng mang đến cho họ loại trải nghiệm mà tôi tự tìm kiếm.
Đơn giản hóa bằng cách tập trung vào các yếu tố cần thiết
Chỉ vì tôi có thể nhìn thấy một cái gì đó không có nghĩa là tôi phải đưa nó vào bức tranh. Quá nhiều thông tin có xu hướng phá vỡ ảo giác về không gian trong một bức tranh. Nhiệm vụ là tìm cách đơn giản hóa luồng thông tin, đặc biệt là ở những khu vực của hình ảnh không nhằm mục đích thu hút mắt người xem. Nhìn trực tiếp vào nguồn của hình ảnh (ảnh hoặc góc nhìn thực tế) không giống như nhìn vào một bức tranh. Khi mắt bạn di chuyển từ nơi này sang nơi khác trong nguồn, bạn thường có thể thấy rất nhiều chi tiết ở bất cứ nơi nào bạn nhìn. Có thể nhìn thấy màu trắng sáng và màu tối rất tối ở xa, nhưng việc tô toàn bộ phạm vi giá trị ở phần nền sẽ mang lại cho phần đó của cảnh tầm quan trọng về mặt thị giác như điểm tiêu cự dự định. Phần nền sẽ xuất hiện ở phía trước trên mặt phẳng của bức tranh, gây nhầm lẫn về cảm giác về không gian.
Vậy thì, làm sao chúng ta có thể chọn những gì để thể hiện cụ thể và những gì để suy ra? Tất nhiên, việc tìm ra các yếu tố thiết yếu của một chủ đề phụ thuộc vào sở thích của từng nghệ sĩ, nhưng để khái quát, hãy giả sử chúng ta muốn thể hiện cảm giác thuyết phục về bản chất của chủ đề, ảo giác về không gian thực và cảm giác mạch lạc về ánh sáng.

Giá trị – biến số quan trọng nhất
Trong tất cả các biến số hoạt động trong quá trình vẽ một bức tranh hiện thực, biến số quan trọng nhất là giá trị. Việc bạn sử dụng màu sắc có thể kỳ quặc hoặc u ám và bức vẽ của bạn có thể không chính xác, nhưng miễn là các mối quan hệ giá trị là đúng thì bức tranh sẽ chắc chắn. Bắt đầu bằng một bản phác thảo đơn sắc năm giá trị của chủ thể là một cách tốt để khám phá cấu trúc cơ bản của bức tranh. Việc giới hạn hình ảnh ở màu trắng, xám nhạt, xám vừa, xám đậm và đen buộc tôi phải đơn giản hóa dòng thông tin. Tôi đã chọn Carbazole tím cho bản phác thảo của tôi Cửa màu xanh — một màu có thể tối đủ để biểu thị màu đen. Đơn giản như vậy, bản phác thảo nhanh đóng vai trò là điểm tham chiếu cho các quyết định về nơi cần thêm sự tinh tế và nơi cần xử lý rất chung chung.
Xem lại bản phác thảo này, một số điều trở nên rõ ràng. Trước hết, đây là một hình ảnh đông đúc. Hầu như tất cả các hoạt động đều diễn ra trong một không gian tương đối nông. Mảng hình chữ nhật, hình bầu dục, đường thẳng và hình trụ nổi riêng biệt trên bề mặt của trang, được giữ lại với nhau bằng ma trận của bức tường. Vì lý do đó, tôi sẽ không tập trung vào kết cấu phức tạp của chính bức tường—đã có đủ thứ diễn ra trên mặt phẳng đó. Tôi sẽ tìm cách gợi ý về sự phong phú của kết cấu mà không cạnh tranh với độ rõ nét của các hình dạng chính.
Tiếp theo, những vùng tối nhất thì thưa thớt, nhưng rất quan trọng. Chỉ cần một vài nét mỏng phân bố trên bề mặt cũng tạo ra chiều sâu và độ chắc chắn đáng kể. Vì chúng rất mạnh, tôi biết mình sẽ bị cám dỗ thực hiện nhiều nét như vậy. Sẽ rất dễ để làm quá. Khi tôi đang sơn lớp cuối cùng, tôi thường phải nhắc nhở bản thân lùi lại sau một vài nét đầu tiên và tự hỏi liệu như vậy đã đủ chưa.
Một hình ảnh thuyết phục trong năm giá trị
Luôn luôn thú vị khi khám phá ra rằng chỉ cần năm giá trị của một màu duy nhất có thể đi xa đến vậy để tạo ra một hình ảnh thuyết phục. Trong trường hợp này, chỉ có một vài nơi mà tôi cảm thấy cần phải tinh tế hơn hoặc cụ thể hơn. Những cánh cửa, thứ đã thu hút tôi vào cảnh này ngay từ đầu, muốn có chiều sâu và chất hơn. Ở đây, tôi đã sơn cánh cửa chính giữa chỉ bằng ba lớp: xám trung bình, xám đậm và đen. Phiên bản cuối cùng sẽ được hưởng lợi từ lớp đầu tiên của giá trị sáng, với một vài khu vực được để lại như "lỗ" trong lớp thứ hai trung bình. Các cánh cửa cũng nên tối hơn một chút so với tường để làm nổi bật không gian nhỏ bé trong bức tranh.
Các dải ngang của bầu trời và con đường có thể đóng vai trò như một loại khung cho toàn bộ hình ảnh. Chúng sẽ chứa tất cả các hình dạng riêng biệt đó, đặc biệt là vì các cạnh của hình ảnh được cắt xén theo cách ngẫu nhiên. Bầu trời đủ rộng để giữ nguyên, nhưng dải đường hẹp dọc theo phía dưới sẽ cần phải rõ ràng hơn theo chiều ngang. Tôi phải nhớ để các nét vẽ lỏng lẻo xác định nó vẫn đẹp và phẳng.
Từ sáng đến tối, từ chung đến cụ thể
Bản chất trong suốt, trôi chảy của màu nước gợi ý một tiến trình vẽ tranh hợp lý chuyển từ sáng sang tối và từ tổng quát sang cụ thể. Trước khi bắt đầu bức tranh cuối cùng, tôi cố gắng hiểu chủ đề như một loạt các lớp tuân theo tiến trình này. Tôi tưởng tượng một chuỗi các lớp phim trong suốt sẽ tạo nên sự phức tạp hoàn chỉnh của hình ảnh. Mỗi lớp có các vùng không được tô màu, hay còn gọi là "lỗ", cho phép lớp trước đó hiển thị mà không thay đổi. Một lần nữa, bản phác thảo năm giá trị đóng vai trò hướng dẫn tôi lựa chọn việc cần làm trước.
Một số câu hỏi cơ bản giúp lập kế hoạch vẽ tranh
1. Khu vực sáng nhất của bức tranh là gì? Trong trường hợp này rõ ràng là bức tường, vì vậy tôi sẽ bắt đầu từ đó.
2. Có một màu duy nhất tôi có thể phủ lên toàn bộ khu vực đó không? Tông màu nâu vàng ấm áp của vữa trát chiếm phần lớn phần giữa bức tranh, nhưng trước khi phủ lớp sơn đó, tôi cần hỏi một câu hỏi khác.
3. Có thứ gì tôi cần sơn xung quanh không? Tôi đang tìm những nơi trong hình dạng lớn không nên có lớp màu nâu nhạt đó làm lớp đầu tiên. Một vài màu trắng được xác định trong bản phác thảo giá trị phải được giữ lại. Tôi cũng muốn để lại điểm nhấn trên viên gạch chèn, vì vậy tôi sẽ sơn xung quanh toàn bộ hình bầu dục đó ngay bây giờ. Tôi muốn giữ nguyên độ trong của màu xanh lam ở các cánh cửa, vì vậy mặc dù chúng sẽ tối hơn nhiều so với tường, tôi cũng sẽ để chúng màu trắng. Tôi trộn màu vàng đất với titan màu nâu nhạt và phủ lên khá ướt, để có thời gian cân nhắc câu hỏi tiếp theo.
4. Tôi có nên làm gì khi tường vẫn còn ướt không? Đây là cơ hội để tôi gợi ý về kết cấu phức tạp của bức tường mà không làm cho bề mặt quá bận rộn. Việc thêm các màu có giá trị cao, gần như trung tính khác vào lớp sơn đầu tiên sẽ tạo thêm sự đa dạng mà tôi cần, và các cạnh mềm mại đảm bảo rằng nó sẽ không cạnh tranh với các hình dạng cửa và bóng đổ rõ nét hơn sẽ xuất hiện sau đó. Nhìn chung, bạn nên đưa kết cấu và độ phức tạp tổng thể vào lớp đầu tiên khi tường vẫn còn ướt. Các vết bẩn và đốm trên tường trát vữa là một ví dụ điển hình. Sau đó, khi một lớp cụ thể hơn, như bóng đổ của các biển báo, được đặt lên trên thông tin chung đó, nó sẽ giúp kết nối tất cả lại với nhau.

Lớp 1
Tôi khuyên bạn nên đặt lớp đầu tiên ở khắp mọi nơi trong bức tranh trước khi chuyển sang lớp thứ hai và thứ ba ở bất kỳ nơi nào cụ thể. Việc chặn toàn bộ hình ảnh ngay từ đầu trong quá trình này giúp giữ cho toàn bộ bức tranh được gắn kết với nhau. Tôi thú nhận rằng đây là nơi tôi thường xuyên phá vỡ các quy tắc của chính mình nhất, vì đôi khi tôi không thể cưỡng lại việc nhìn thấy phần tôi đang vẽ ngay bây giờ sẽ trông như thế nào khi phủ lớp tiếp theo. Ví dụ, việc tô bóng xung quanh cửa trước khi bản thân cửa có lớp đầu tiên khiến việc cảm nhận chiều sâu của không gian trong cảnh trở nên rất khó khăn. Tuy nhiên, ngay khi lớp màu xanh đầu tiên được phủ xuống, bức tường bắt đầu có cảm giác liền mạch và chắc chắn.

Lớp 2
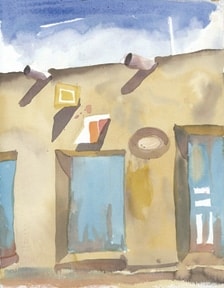
Sau khi xác định được tầm quan trọng tương đối của các phần khác nhau trong hình ảnh, bạn có thể quyết định nên sử dụng bao nhiêu lớp cho mỗi phần. Ví dụ, những ngọn núi xa xôi có thể chỉ cần một lần rửa nhẹ, trong khi một tòa nhà ở khoảng cách giữa có thể cần phạm vi giá trị bốn lớp đầy đủ. Vì cửa là phần phức tạp nhất của bức tranh này, chúng ta hãy xem xét sự tiến triển của các lớp tạo nên chúng. Trước khi áp dụng từng lớp, tôi lại hỏi những câu hỏi cơ bản của mình. Khi nhìn vào cánh cửa bên phải, bạn có thể thấy lớp đầu tiên màu xanh lam nhạt nhất (1, 2). Lưu ý rằng tôi đã sơn xung quanh bốn hình chữ nhật không thể có màu xanh lam làm nền (3). Trong lần rửa đầu tiên đó, cũng có một vài nơi tôi chọn thêm màu khi nó vẫn còn ướt (4).
Trong hình ảnh tiếp theo, cùng cánh cửa đó giờ có một lớp màu xanh thứ hai, hơi tối hơn. Ở đây, tôi muốn giữ lại bốn hình chữ nhật đó một lần nữa, cộng thêm một chút lớp đầu tiên xung quanh chúng, lớp này sẽ trở thành các cạnh của các tấm ốp nổi. Lưu ý rằng lớp này nhỏ hơn và cụ thể hơn lớp trước. Các nét cọ tạo nên lớp này đều được kết nối, nhưng lớp rửa bắt đầu tách thành các nét riêng biệt.
Lớp 3
Nhìn vào cùng một khu vực trong bức tranh hoàn thiện, có thể thấy thêm hai lớp nữa. Bóng đổ của phần nhô ra tương ứng với màu xám đậm trong nghiên cứu giá trị. Tôi cũng đã thêm một vài nét rất cụ thể để thể hiện các mặt được tô bóng của các tấm nổi.
Ngay khi tôi thấy lớp hiện tại bao gồm các nét vẽ nhỏ, riêng biệt, tôi biết mình đang đến đúng nơi để dừng lại. Nhận ra khoảnh khắc này có thể là kỹ năng quan trọng nhất. Nó liên quan đến khả năng nhìn vào bức tranh của chính bạn như thể người khác đã vẽ nó. Hãy nhớ rằng, tốt hơn là phạm sai lầm về phía quá ít thông tin hơn là quá nhiều. Sau một thời gian trôi qua và bạn có thể tách biệt hơn khỏi tác phẩm, bạn luôn có thể thêm các nét vẽ còn thiếu.

Lớp 4
Bây giờ hãy nhìn vào cánh cửa bên phải trong bức tranh đã hoàn thành và thử xem quá trình này ngược lại. Tôi đếm được bốn lớp, mỗi lớp nhỏ hơn và tối hơn lớp trước.
Học bằng cách nhìn
Sẽ rất hữu ích nếu bạn xem xét kỹ lưỡng các bức tranh mà bạn ngưỡng mộ để xem có bao nhiêu lớp liên quan. Hãy xem bạn có thể biết được điều gì đã được thực hiện trước, sau đó là điều gì tiếp theo và tiếp theo nữa không. Bạn có thể ngạc nhiên khi thấy rằng hiếm khi cần hơn bốn hoặc năm lớp để đạt được mật độ và ánh sáng rất thuyết phục. Nhiều hình ảnh có vẻ chi tiết của Sargent chỉ được tạo thành từ ba lớp. Phần lớn nước phức tạp và lưu động đáng kinh ngạc của ông chỉ được thực hiện bằng lớp đầu tiên gồm các nét vẽ theo chiều dọc được giao nhau bởi một lớp thứ hai gồm các nét vẽ theo chiều ngang.
Tất nhiên, sẽ có một số chủ đề không thể giải quyết thành một loạt các lớp đơn giản, nhưng như một cách tiếp cận chung để đơn giản hóa quá trình vẽ của bạn, đây là một nơi hiệu quả để bắt đầu. Tiến lên và hướng lên!
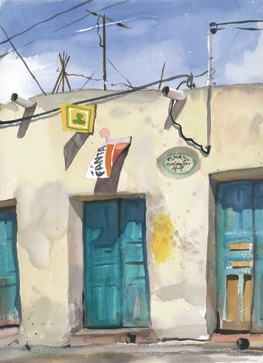
Cánh cửa màu xanh của Tom Hoffmann


